Followers

Tuesday 27 August 2013

Spring is coming

To celebrate the imminent arrival of SPRING, after what for us seems to have been a long cold and wet winter, todays card was born.

I went out shopping today, and called into a 'Cheap as Chips' store to browse through their 'Craft' section, I was surprised at how much stuff they actually carry that I wouldn't call cheap and nasty!
I found a couple of silicone stamp sets for only $2 each. WOW they they are beautiful.

The Stamps are manufactured by Artworks and are called scrapbook clear stamps. the one I've used on this card has flower groups, a vase, flourish and tiny butterfly. The Springtime sentiment comes from the second set which has some pretty spring borders, easter bunnies in two sizes and easter eggs as well as a flourish and the Spring Sentiment.

I used a good weight white card for my base, and Stampin Up's Whisper white and Pistachio Pudding.

I stamped the Flower group in Tuxedo Black Memento ink, and the vase in  Strawberry Slush. I stamped the vase twice, and cut out the second one to mount with dimensionals giving some height and texture.

After stamping onto Whisper White, I matted this onto Pistachio Pudding before mounting onto my base.
I used Stampin Up's write markers to initially colour my flower group, but when it fully dried decided it needed more umph! and touched up to brighten the colours with Copics, and plenty of stickles and Kindy Glitz.

The butterflies were stamped onto my WW top layer, then stamped again and fussy cut out. I used tiny dots of wet glue to stick them in the body section only so that the wings can sit up.


I had fun making this card as I just love the stamps in both sets.

Thanks for visiting my blog today, come again soon.

Hugs
Beth


Wednesday 14 August 2013

Gatefold with die cut aperture card

I found the inspiration for todays card from this site: http://frommycraftroom.blogspot.ca/ the card that inspired me is called Gate-fold with Window Card Tutorial. That this is a tutorial is great, because just knowing how to cut the front of a gatefold like this opens a zillion possibilities for other cards.
So I'd like to express my thanks to Norma for her tutorial, beautiful cards and the inspiration she's given me.

Of course my card is not a carbon copy, it's my own work. and I found it really interesting and enjoyable to do this really quite easy card. Let your imagination Flow.......

Here are three photo's of my card, one closed, held down by my finger, sorry couldn't edit the finger out. the second is the card standing normally as it would displayed, and finally the card laid out flat so you can see the inside.

The base card is made using Foliart Damast Karton 250gsm card which comes in packs of 10 13.5 x 27cm  pieces from Blue Edge Crafts, you will find a link here on my blog for Blue Edge Crafts.

The patterned paper is Stampin Up's DSP Regals collection, which comes in a pad of 40 double sided 12" x 12" in the Regals colour range.

The die I used to cut the aperture is a Spellbinders Nestabilities die called Labels Twenty. I purchased this from Blue Edge Crafts. I used Stampin Up's Very Vanilla as my cream and the stamp set is Stampin Up's Because I care, which was a Hostess gift last year.
Other things used are two Stampin Up Oval punches, Stampin Up's Classic Ink Pad in Perfect Plum to sponge the edges, and I also used Stampin Up's Write Markers to colour in my stamp before stamping allowing me to have different colours and tones where I wanted them.
I finished with  some tiny crystal gems and used Martha Stewart Punches to punch the flowers and butterflies.
The inside Very Vanilla is embossed with Stampin Up's new embossing folder called Modern Mosaic.


Thank you for visiting my blog today. Please consider joining as a follower.

Happy Crafting
Hugs
Beth

Monday 12 August 2013

Easel Gatefold Card

I was surfing the web looking for ideas for different shapes of cards and came across several places where the shape of the Gatefold so beloved by many was enhanced with the addition of an Easel section in the middle.
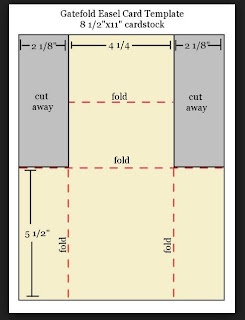
I saw a few ideas for decorating, but was less interested in how others had decorated their cards than the shape of the card. I LOVE, LOVE this card shape. It's Easy to do, after the photo's of my card, I'll include a diagram to help get you started.

I used the following products for my card:

  • Stampin Up's Primrose Petals card stock, Classic Ink-pad and Write Marker
  • Stampin Up's Baked Brown Sugar Card stock and Classic Ink-pad 
  • Stampin Up's Very Vanilla Card stock
  • Stampin Up's Flowering Flourishes Stamp Set
  • Stampin Up's Elements of Style Stamp Set
  • Stampin Up's Lattice Embossing Folder
  • Stampin Up's Dimensionals
  • Stampin Up's Basic Pearls
  • Martha Stewart Border Punch
  • Double Sided Tape
  • Stickles
This first photo shows the card closed. I had to use my bone folder to help keep it closed for the photo, if this is an issue with you, you can always make a belly band to keep the card shut.


The Second Photo shows the card with the gatefold wings open so you can see how it looks when you first open it.


The third photo shows the card with the easel standing fully open.


This is the diagram for cutting the base card.


The shape of this card is not my idea, but the decoration of it is entirely from my own creativity, the possibilities are endless.

Thank you for visiting my blog today, I hope you can take some small measure of inspiration from what you see.

Happy Crafting,
Beth

Monday 5 August 2013

Unstampabelles August Challenge No. 26 Dress

The prize for Challenge No. 26 comes from the sticker store, you will find a link to the Sticker Store here on my blog. It's a GREAT place to get really good quality stickers for all types of applications. This is the prize they have on offer.
The Challenge for this month is to create a card with a DRESS theme without using stamps of course.

THE PRIZE


Here are two photo's of my Design Team card. To make my card I've used a silver sticker from Blue Edge Crafts, which is a sister store for the Sticker Store.
I placed my sticker carefully onto some embossed and glittery card stock then fussy cut it out.
My colour scheme as you can see is silver, red, black and white. The two silver panels on the front of this A5 gatefold card is silver card which I embossed with a Couture Creations Embossing folder called 'Diamond Trellis'.
This is the sticker sheet I used.


 The two flourishes inside the card have been die cut with  a Bellish Ezy-Press die from Kaszazz. It goes through pretty much any embossing machine. I use my e-Bosser for all my embossing and die cutting.


I hope you find this card gives you some small inspiration for taking part in our August Challenge at Unstampabelles.
Remember, NO STAMPS!

Thank you for visiting my blog today,
Hugs
Beth